Property Ad Launcher
Launch a Facebook and Instagram lead ad for any of your properties in a couple of taps. Market Trak writes the copy, sets the targeting, and sends every enquiry straight to your Leads dashboard.
The Property Ad Launcher turns one of your listings into a live Facebook and Instagram lead ad in a couple of taps. You pick the property, Market Trak writes the ad copy and sets up housing-compliant targeting, you choose a budget, and enquiries flow straight into your Leads dashboard. Facebook bills your own ad account directly, so you stay in full control of your spend.
Before you start
You need three things in place:
- Facebook and Instagram connected, with advertising access allowed. See Facebook & Instagram Integration. The first time you advertise, you'll be asked to allow advertising access, this is a one-off step that lets Market Trak create the ad on your behalf.
- A Business Manager ad account with a payment method. The ad runs on your own Meta ad account, so it needs an active card set up in Meta Ads Manager. It must be an ad account inside a Meta Business Manager, not the personal ad account Facebook gives every profile: Facebook doesn't let tools like Market Trak run ads on personal accounts. You choose which ad account to use the first time you connect (personal ones are greyed out).
- A privacy policy link, added in your settings. Facebook requires a privacy policy on every lead form, so Market Trak uses your own. Add it under Workspace Settings. (Landing-page ads don't need one, only lead forms do.)
You pay Facebook directly for the ad spend from your own ad account. Market Trak never handles your ad budget, it only builds and launches the ad for you. Publishing an ad uses a few of your Market Trak credits (the launch fee, separate from the Facebook spend); you'll see the amount on the confirmation screen before you launch.
Launching an ad
Open the Ad Launcher
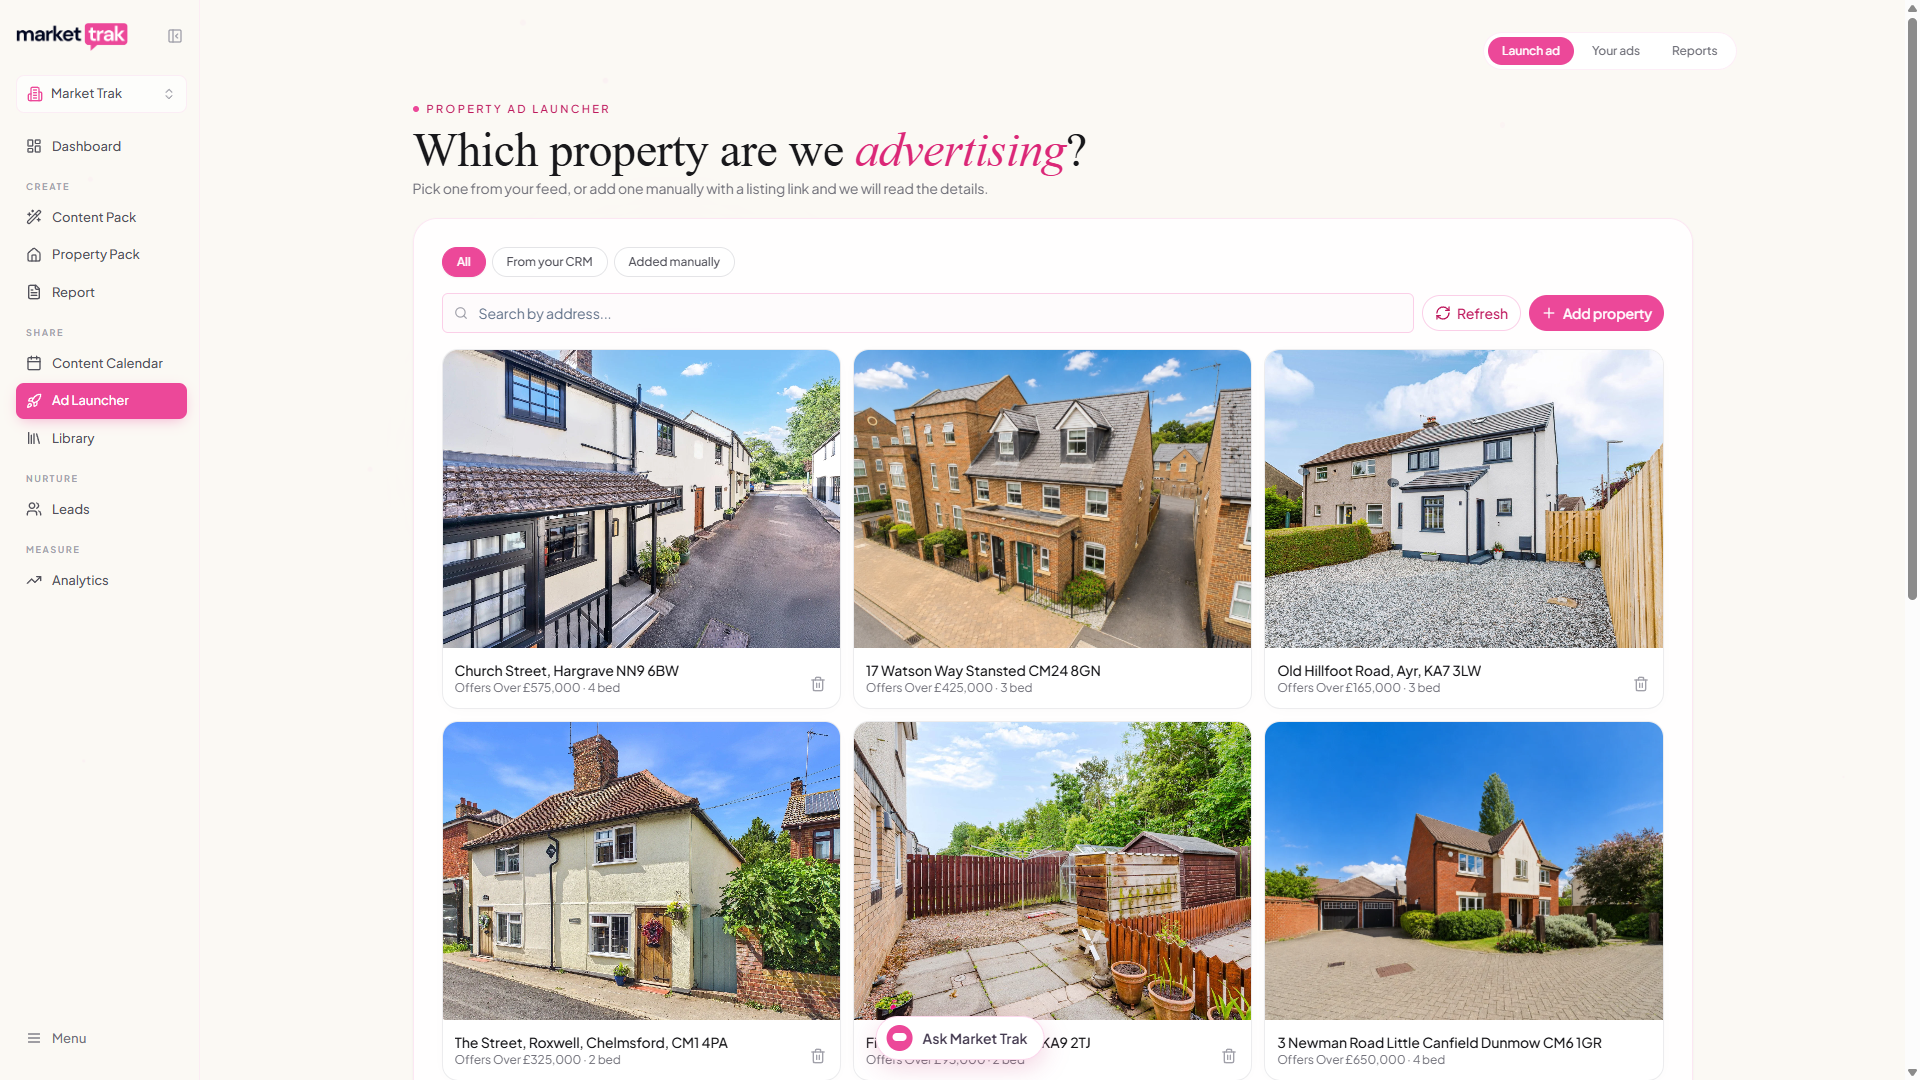
Go to the Ad Launcher from your sidebar (on a phone, tap Content in the bottom bar and choose Ad Launcher). The first screen asks which property you're advertising.
Choose a property
Every property you can advertise is in one grid, newest first, whether it came from your website feed, your CRM, or you added it by hand. Pick one, or click Add property to paste a listing link; Market Trak reads the address, price, bedrooms, and photo from the page and saves it for next time. A small filter above the grid narrows it to one source (for example just your CRM listings) if you want.
Pick the occasion
Choose what the ad is about: New listing, For sale, Coming soon, Open house, Price reduced, or Back on the market. Market Trak writes the ad copy for that occasion.
Review and tweak
Check the headline and ad text. The first draft uses a short introduction followed by scannable feature bullets, the price and a closing invitation. Rewrite switches to a conversational prose version; press it again to return to the bullet layout. You can also pick from several AI headline options or edit anything by hand. The preview shows exactly how the ad will look.
Choose the photo
The property's own photos appear as a strip, so you can run a better shot than the front one; just tap the photo you want. Floor plans and EPC charts are left out. You can also hover the ad image in the preview to Replace it with your own photo or a video, or choose Edit image to touch it up with the AI image editor. A video plays in the ad on Facebook and Instagram; Market Trak uploads it for you when you launch (use an MP4 or MOV file).
Brand the photo (optional)
Switch on Branded version to bake your agency's mark, a short property line (for example "2 bed bungalow in Ayr"), and an occasion tag straight into the photo, so the branding travels with the image wherever the ad is shown. It fits the photo's own shape, so a wide photo stays wide. Prefer the untouched shot? Leave it on Listing photo.
Choose where leads go, and the button
Decide what happens when someone taps the ad: Lead form (recommended) opens a quick enquiry form right on Facebook, or Send to property details takes people to the property's page on your website. Then pick the Button the ad shows, for example Learn More or Sign Up. The button choices change with where leads go, because Facebook only allows certain buttons on a lead-form ad; Market Trak only ever offers ones that will work.
Add a qualifying question (optional)
For lead-form ads you can add up to two qualifying questions from a ready-made list, for example "Would you need to sell to buy this property?", "Do you have a property to sell?", or "Would you like a free valuation of your own home?". Tap a question to add it, tap again to remove it. All questions are multiple choice, so the enquirer just taps an answer. See below for how the answers reach you, and for the trade-off to be aware of.
Set your budget
Choose a daily budget and how many days to run. Market Trak shows the total spend and the date the ad will end. The targeting is automatic (see below), so there's nothing else to configure.
Launch
Confirm and launch. The ad goes live on Facebook and Instagram, and you're taken to Your ads, where the new ad is at the top of the list.
How targeting works
Property ads fall under Facebook's special Housing category, which deliberately restricts audience targeting to keep advertising fair. Because of that, the Ad Launcher keeps targeting simple and compliant for you:
- The ad is shown to people in a local radius around the property, the tightest radius Facebook allows for housing ads.
- The wording names the town shown in your listing, but never includes the street, house number or full postcode. If your feed supplies only a postcode district, Market Trak uses the nearest local settlement.
- There's no age, gender, or interest targeting (the Housing category does not permit it).
- The exact address is never used for targeting, only a general location pin.
There's nothing for you to set here, it's handled automatically.
Where your enquiries go
When someone fills in the ad's enquiry form, the lead appears in your Leads dashboard within moments, tagged as coming from your Facebook ad and attributed to the property it was about. You also get an email notification for every new enquiry, so you can follow up quickly. If you've set up a lead webhook, the enquiry is sent to your CRM or connected tool at the same time.
Speed matters with property enquiries. The email notification means you can respond while the enquiry is still fresh, which is when it's most likely to convert.
Qualifying questions
By default the enquiry form asks only for name, email, and phone, which Facebook pre-fills from the person's profile, so enquiring takes a couple of taps and you get the most enquiries.
Adding a qualifying question changes that trade-off deliberately: the enquirer has to answer it themselves, so you'll typically get fewer enquiries, but each one tells you more. A "Yes" to "Would you need to sell to buy this property?" is a buyer with a home to sell, which is a potential instruction as well as a viewing.
- Questions come from a ready-made list and are all multiple choice, one tap to answer.
- You can add up to two per ad, and they're off by default.
- The answers appear on the lead's record (under Enquiry answers), in the enquiry email, and in your lead webhook payload, so your CRM can filter on them.
One question is usually the sweet spot. In a busy market, use a question to filter for the enquiries worth calling first; when you want maximum volume, leave them off.
Managing your ads
Open the Your ads tab to see every ad you've launched, with its status, daily budget, enquiry count, and spend. For each ad you can:
- Pause or resume it at any time.
- Change the budget without relaunching: tap the daily amount (the "per day" figure with the pencil) on the ad's card.
- Extend an ad that has finished its run, set a new budget and a few more days and the same ad goes live again, keeping its history and enquiries.
- End an ad when you're done. It stops for good but stays in your records for reporting.
You can filter by Active, Paused, Ended, or All, and search by property or headline.
If you delete an ad in Facebook's Ads Manager, Market Trak notices the next time Your ads syncs and moves it to Ended automatically, so you won't be left with an ad you can no longer run.
If Facebook stops your ad
Facebook reviews every ad, and occasionally it stops one. This can happen straight after you launch, or days into a run.
If that happens, Market Trak emails the workspace owner as soon as Facebook tells us, so a stopped ad never goes unnoticed. The ad shows as Needs attention on the Your ads tab, and its card explains in plain English what Facebook flagged and what to change, so you don't have to go into Ads Manager or decode Facebook's policy wording.
Your ad isn't running while it's stopped, and you aren't charged for it during that time.
The card tells you what to do next, and it isn't always about the ad itself. The most common reasons are a payment problem on your Facebook ad account, such as a card that has expired or a spending limit you've hit, or a restriction on the account as a whole. Neither of those needs the ad rewriting; both are fixed in Facebook Ads Manager, and the ad can run again once they're sorted.
If it genuinely is the ad's wording or image, the card says so and what to change. Make the change and launch a fresh ad for the same property. And if you think Facebook has got it wrong, you can appeal directly in Facebook Ads Manager; appeals are handled by Facebook, not Market Trak.
If the ad starts running again, either because you appealed successfully or Facebook re-reviewed it, the notice clears itself and the ad returns to Live.
Seeing how your ads are performing
The Reports tab shows how your ads are doing and what your enquiries did next.
Use the date range at the top, Today, Yesterday, or the last 7, 14, 30, or 90 days, to choose the period. Every range includes the current day, so an ad launched this morning shows its figures straight away (today's numbers are Facebook's running totals and can trail Ads Manager by a few minutes). Everything on the page (the totals, the per-ad breakdown, and the enquiry outcomes) reflects the range you pick. Switching the range is instant; the Refresh from Facebook button pulls the latest figures.
Ad performance
You'll see your totals for the period, plus a breakdown for each ad:
- Spend, impressions, and clicks, pulled live from Facebook.
- CTR (click-through rate), the share of people who clicked after seeing the ad.
- Enquiries, the leads delivered to Market Trak.
- Cost per enquiry, your spend divided by your enquiries.
An ad appears in the list if it was running during the period you've chosen (or is running now). Ads that finished outside the range drop out of view; their figures still exist, they're just outside the window you've selected.
What your enquiries did next
Below the performance figures you'll see how many of the leads from your ads went on to:
- Request a valuation through your instant valuation tool, or
- Open one of your reports.
These only show when there's something to report, so an empty result won't clutter the page.
Spend, impressions, and clicks come from Facebook; enquiries come from the leads delivered to Market Trak. That's why your enquiry count stays accurate even when Facebook's spend figures are still catching up.
Tracking ad clicks in your own analytics
Every ad you launch is automatically tagged with tracking parameters (UTMs), so clicks from your ads show up in your own website analytics, such as Google Analytics, as Paid Social, broken down by property and by placement (Facebook Feed, Instagram Stories, and so on). There's nothing to set up: the tags are added for you, and you can view or adjust them in Meta Ads Manager under the ad's URL parameters.
Managing the property picker
The picker on the first screen is your library of properties to advertise. Everything is in one grid, newest first, and a small filter above it (All, From your website, From your CRM, Added manually) narrows the grid to one source when you want it:
- New listings appear automatically as your property feed or CRM picks them up.
- Add property (always next to the search box) pastes a listing link to add any property right away, it's saved so you can reuse it.
- Remove a property with the trash can on its card. Website-feed and manually added listings don't drop off by themselves, so use the trash once a property is sold or withdrawn. This only removes it from the launcher, it doesn't affect your social-post feed.
- CRM-synced properties have no trash can: your CRM connection manages them for you, so sold and withdrawn listings drop off automatically and a live listing is always there to advertise.
- Connected both a CRM and a website feed? Market Trak spots when the same property arrives from both and shows it once: the CRM copy of the listing stays (it keeps itself up to date), and it borrows the property's web page link from your site so ads and packs can still link to the listing.
If you're asked to reconnect or allow advertising
Facebook uses one connection for both posting and advertising. If you reconnect Facebook for posting, or change your Facebook password, the advertising permission can drop off. When that happens, Market Trak tells you clearly rather than failing quietly:
- The Advertising card in Workspace Settings > Integrations shows Reconnect needed with an Allow advertising button.
- When you go to launch, the Ad Launcher shows the prompt right inside the launch box. Your ad is saved, so after you allow access you're brought straight back to it to carry on, nothing you built is lost.
- The Reports and Your ads screens show a reconnect banner if your figures can't update.
Click Allow advertising (or Reconnect Facebook) and approve advertising access, and you'll be brought straight back to carry on. Your enquiries and saved ads are never affected, only the live Facebook figures pause until you reconnect.
If a launch is blocked
Facebook checks a few things on your account before it lets an ad run. If any are missing, the launch box tells you what to fix and links you straight to the right place. The three most common are one-off setup steps:
Accept Facebook's lead ads terms
The first time your Page runs a lead ad, Facebook needs a Page admin to accept its Lead Generation Terms of Service. It's a one-time step per Page. The launch box links you to the acceptance page; accept it while logged in as a Page admin, then relaunch.
Add a payment method
If your ad account has no card set up, the launch box links you straight to that account's billing settings in Meta Ads Manager. Add a payment method there, then relaunch.
Use a Business Manager ad account
If you connected the personal ad account Facebook gives every profile, ads can't run on it. Go to Workspace Settings > Integrations > Advertising and pick an ad account from your Meta Business Manager instead. If you don't have one yet, you can create an ad account there for free.
Nothing is charged when a launch is blocked, and the ad you built is kept, so you can fix the setting and relaunch without redoing your work.
Not getting enquiries?
In most cases enquiries flow automatically once advertising is connected. If an ad is running but no enquiries are arriving, it's almost always one specific setting: some Facebook Pages use Business Manager's Leads Access to control which tools can receive their leads. If yours does, you'll need to allow Market Trak there once.
Open Leads Access
In Facebook Business Settings, go to Integrations > Leads Access and select your Page.
Add Market Trak as a CRM
Under the CRMs section, allow Market Trak. This is a one-time step Facebook requires for security, no tool can grant it for you.
Test again
New enquiries will then flow into your Leads dashboard as normal.
Most Pages never need this step. It only applies to Pages that have switched on Leads Access restrictions in Business Manager.