

Email Campaigns
Send targeted email campaigns to your leads using templates, variables, and the queue-based sending system.
Email campaigns let you send targeted messages to your leads with market data, report links, and personalised content. Campaigns are sent in the background so you can keep working while emails go out.
Creating a campaign
There are two ways to send a campaign:
From the Leads page
-
Go to Leads in the sidebar
-
Select the leads you want to email (use checkboxes or filters)
-
Click Send Campaign
-
Choose a template or write a custom email
-
Set the subject line
-
Preview the email
-
Choose Send now or Schedule, then click the button at the bottom, which tells you exactly who it is going to (Send to 24 people, or Schedule for 24 people)
From the AI Assistant
Ask the assistant to draft and send an email campaign. See Creating Content for details.
Choosing recipients by area
When you open Send Campaign without pre-selecting leads, you can pick recipients by postcode district (like CM1, with the town shown alongside and a count of how many leads each district reaches). A lead is included if any of the areas of interest on their record matches a district you tick, so one lead can be reached for every area they have enquired about, not just their latest one. Leave everything unticked to send to all active leads.
Each district also shows when its leads last received a campaign from you, for example "emailed 2 days ago", or "never emailed" if nothing has ever gone to them. That makes it easy to spot an area you have been overlooking while you are choosing who to send to. Automatic welcome emails do not count, only campaigns you sent.
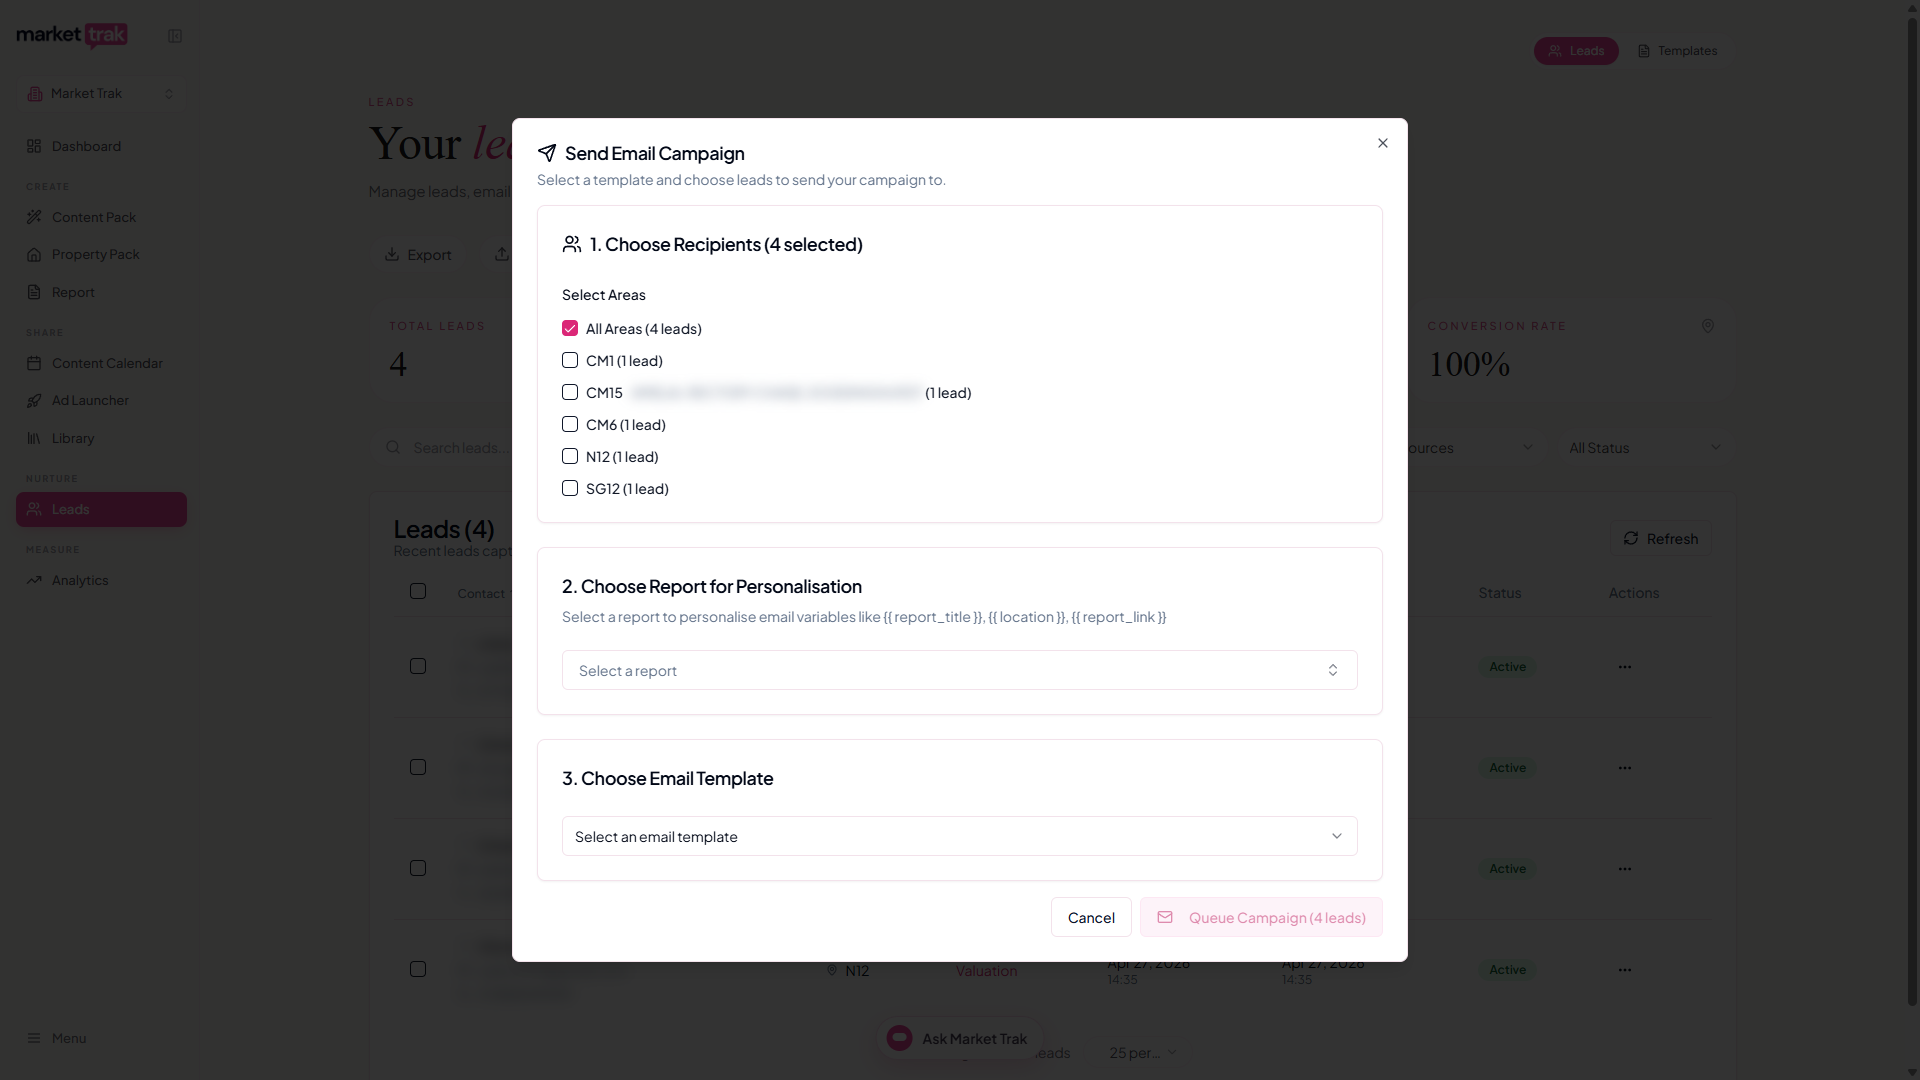
Each lead's areas build up automatically from their enquiries, and you can edit them on the lead's record. See Managing Leads.
Scheduling a campaign for later
You do not have to send straight away. In the send window, choose Schedule instead of Send now, then pick a date and time. Write the campaign whenever suits you and let it go out on a Tuesday morning.
Who a scheduled campaign reaches
When you schedule by area, you choose who it should reach when the time comes:
-
Everyone in your areas at the time (the default) sends to the leads you can see now, plus anyone who joins those areas before it goes out. This is usually what you want, since the whole point of scheduling ahead is that more leads arrive in the meantime.
-
Only the people on the list now fixes the list at the moment you schedule. Anyone who joins afterwards will not get it.
This choice only appears when you have targeted by area and picked a future time. If you hand-picked individual leads, or you are sending from a report, the list is always fixed, because there is no area rule to re-check.
Anyone who unsubscribes between scheduling and sending is removed automatically, whichever option you choose.
Changing or cancelling
Scheduled campaigns wait on the Scheduled tab on the Leads page, showing when each one goes out and how many people it reaches. You can cancel any of them right up until they send. Cancelling does not delete anything, so you can build the campaign again if you change your mind.
Email templates
Templates save time when you send similar emails regularly. Each template includes:
-
Subject line - with optional variable placeholders
-
Email body - HTML content with variables
-
Variable placeholders - automatically filled with lead and report data
Template editor
The template editor lets you write and preview your email. You can:
-
Format text with a rich editor
-
Insert variables from a picker
-
Preview how variables will render
-
Save templates for reuse
Available variables
| Variable | What it inserts | Example |
|---|---|---|
{{lead_name}} | Lead's first name | "Sarah" |
{{location}} | Property or report location | "Didsbury" |
{{workspace_name}} | Your company name | "Smith & Co" |
{{report_title}} | Title of the linked report | "Didsbury Property Market Report" |
{{report_link}} | Clickable link to the report | A styled hyperlink |
{{current_date}} | Current month name | "March" |
{{averagePrice}} | Average price with currency | "£456,789" |
{{priceChange}} | Price trend with sign | "+5%" |
{{marketTrend}} | Trend direction | "Rising" |
{{demandRating}} | Demand level | "High" |
{{daysOnMarket}} | Average days on market | "45" |
{{salesVolume}} | Sales per month | "120pm" |
{{unsubscribe_link}} | Unsubscribe link (required) | A styled hyperlink |
Important: Every campaign email must include
{{unsubscribe_link}}for legal compliance.
How sending works
When you send a campaign, it does not send all emails at once. Instead:
-
The campaign is queued instantly (you see confirmation within a second)
-
A background job processes the queue every 2 minutes
-
Emails are sent in batches to respect provider rate limits
-
You receive a notification when the campaign is complete
This queue system means:
-
Sending a campaign never blocks you from using the app
-
Large campaigns (hundreds of leads) are handled smoothly
-
Rate limits are respected automatically
-
Failed emails are retried with exponential backoff
When a lead replies
Campaign emails are sent from Market Trak, but they are set up so that replies come to you, not to us. When someone on your list replies to a market update, it arrives in the inbox on your account, and hitting reply puts you straight back in touch with them.
A small number of mail systems answer automatically rather than sending a real reply, and those answers go to the hidden address email providers use for delivery reports instead of to you. Market Trak now picks those up and forwards them on, so nothing gets lost. Empty automatic responses, such as out-of-office notices with no message in them, are left out, so you only hear about a reply when there is something to read.
If you want replies to go somewhere other than your account email, such as a shared office inbox, set a reply-to address on your custom sending domain in Settings.
Campaign tracking
After sending, you can see the campaign status:
| Status | Meaning |
|---|---|
| Queued | Campaign is waiting to be processed |
| Processing | Emails are being sent |
| Completed | All emails sent successfully |
| Partially Failed | Some emails failed (e.g. bounced addresses) |
Email open tracking
Every campaign email includes a tracking pixel that records when a lead opens the email. You do not need to configure anything; it is automatic.
To see your email engagement data, go to Analytics under Measure in the sidebar and find the How your emails land card. You will see:
- Email opens over the last 30 days, with your blended open rate
- Each campaign with its recipients, when it went, its opens and its open rate, strongest rates highlighted
Each campaign is listed by the subject line your recipients actually saw, with any placeholders filled in, so a campaign built from {{location}} Market Update - {{current_date}} appears as "KA7 Market Update - July".
Automatic welcome emails are left out of this table. They go to one lead at a time and are not campaigns you chose to run, so counting them would flatter your open rates and bury the campaigns you actually sent. They still appear on each lead's own record.
The dashboard also shows a quick summary of email opens in the Engagement Snapshot widget.
Email limits
Your plan includes a monthly email sending limit. Check your current usage in the profile menu or on the Workspace Settings page.
Tips
-
Personalise with
{{lead_name}}to boost open rates -
Link to a specific report with
{{report_link}}so leads can explore the data -
Keep subject lines under 60 characters
-
Include market data variables (prices, trends) to make emails feel current and relevant
-
Send campaigns during business hours for best engagement